The following is a pretty long-winded guide to compost. I'm no expert (I really sucked at biology), so take what you like and what makes sense to you. I welcome comments or suggestions!
Traditional "book" way to compost:
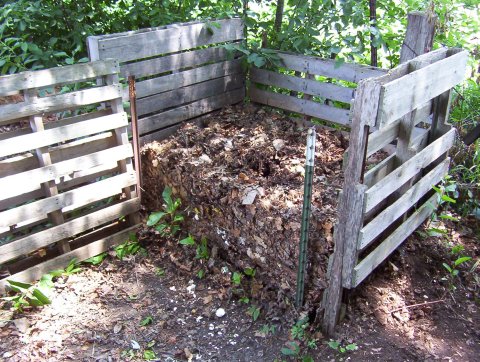
1. Build a compost bin. A
3-section wooden compost bin was popular in older books, but now
tumblers are kind of trendy. Cheaper options can be made from
wooden pallets or from fencing.
2. Gather materials. Compostable materials are divided into
"greens" and "browns" (or "nitrogen-rich" and "carbon-rich" materials) and ideally you want to have a good mix of the two. Most organic materials can be composted, but not:
- meat, oil, or dairy products - these attract bugs and rodents and smell awful
- certain kinds of animal waste, like dogs or cats - these can contain harmful bacteria
- animal corpses - think of them as meat
The link above contains a more thorough list of things you'll be unlikely to think of putting in your pile.
3. Layer the materials in the compost bin. Different sources suggest different layer thicknesses, but most are something like an inch of greens, two inches of browns; honestly the optimal ratio depends on what materials you are using, but anything along these lines will work. Some sources also suggest inserting layers of soil or finished compost, some suggest adding layers of small sticks, some suggest adding peat. (I include these suggestions in order from best to worst - why anyone would want to buy peat and put it in their compost is beyond me. It takes a very long time to break down, is hard to keep moist, and throws off the pH balance. Plus it costs money!)
4. Aerate the pile. The aerobic bacteria that break down materials in a new compost pile need oxygen. (If a pile is too wet or is airtight, anaerobic bacteria will take over the decomposition, which makes the pile stink and - I think - wastes nitrogen.) Traditionally piles are aerated by turning them periodically with a pitchfork. Large piles (like on an organic farm) can be turned with heavy equipment. The municipal compost piles my city maintains are turned with a
special machine built just for this purpose. Compost tumblers can be turned with a hand crank. Turning the pile has the added benefit that the materials at the outside of the pile, which tend to break down more slowly, get mixed into the pile regularly. You can also find sources that suggest less mixing is necessary if you design your compost bin with lots of openings in the sides (like the ones built from fencing) and/or build layers of bulky materials like sticks into the pile, which allow air to blow in the sides of the pile. These strategies become less effective as the materials in the pile break down and compress, and can cause the pile to dry out or freeze.
5. When you think it's done, screen the pile. There is always extra stuff in compost piles that doesn't break down as fast as the rest, or doesn't break down at all: sticks and tree branches, litter, and coconut shells are things I typically find. You can just toss the compost on your garden with this stuff mixed in, but most people prefer to screen the compost first by tossing the finished compost on top of a
wire screen and removing anything that doesn't fall through. Especially if you live in the city like me and have a lot of litter mixed in with your leaves.
How composting works in a "hot" pile:
1. You need a large compost bin to have a truly "hot" pile. The minimum size I've seen is one cubic yard, and that was from a study done in the UK, where the winters are very mild.
2. A good mix of materials are added and mixed well, with just enough water. (Books will tell you the pile should feel like a damp sponge, but different people have a different idea of what that feels like and usually new composters add too much water.)
3. Bacteria begin to colonize the pile, digesting the materials and giving off heat. Adding a little topsoil or finished compost to your pile helps introduce the bacteria. I have never found
compost "starters" to be necessary for an outdoor compost pile, and I don't think it's necessary to buy
worms for an outdoor compost pile. If the pile is off the ground, just add some topsoil to the pile and you should introduce all the creatures you need.
4. Because you have a large pile full of heat-generating bacteria, the pile begins to get warm, which encourages the growth of more (thermophilic) bacteria, which generate more heat. A good pile with enough nitrogen and enough oxygen will get quite warm - warm enough to kill weed seeds and pathogens. I don't think most home composters ever build a pile that hot, though a well-tended pile will get noticeably hot and will even give off steam when turned. People in cold climates have a harder time keeping their piles hot - you need a larger pile, and the material near the outside of it is always cold.
5. Large composting operations track the temperature of the pile and the gases that it gives off to know when it needs to be turned. When the bacteria start to run out of oxygen or food the pile will begin to cool; if the problem is lack of oxygen then turning the pile will cause the temperature to jump back up again. Eventually the pile will be depleted of nitrogen-rich materials and turning it will no longer raise the temperature much, as the bacterial decomposition slows down.
6. Once the pile begins to cool, insects, worms and fungi will move into it and start taking over the decomposition process. They will break down the large chunks of tough, woody materials that the bacteria couldn't digest. Turning the pile during this stage is really fun - it's so amazing how many living things you can find - but kind of pointless.
7. Eventually, you have to decide that the pile is done and screen it. The longer you wait the more nutrients will be washed or carried out of the pile by rain, worms, bugs, and fungi. The organic materials in the pile will break down into smaller and smaller pieces. Weeds seeds will blow into it. If you live in an area like mine, tree roots will grow into it. It's not good to leave it too long at this stage.
Cold composting:
You basically start at step 6, with a mixture of bacterial decomposition and critter decomposition. Things break down more slowly, allowing more time for nutrients to be lost.
Some tips for practical home composting:
1. Home composters don't usually have access to compostable materials in large enough quantities to build the layers suggested in gardening books. Instead, store a large pile of carbon-rich material like leaves or shredded/torn newsprint (just the news pages, not the ads or flyers) near your compost pile in bags or trash cans. As you collect nitrogen-rich materials like kitchen scraps, coffee grounds, or lawn clippings, throw them on top of the compost pile and then cover with carbon-rich materials. During the summer months you can have a fairly hot pile doing this, during the winter it will be more like cold composting unless your pile happens to be quite big.
2. Avoid ever having a large collection of just kitchen scraps, or an overabundance of nitrogen-rich materials in your pile. When these materials are broken down with insufficient amounts of carbon-rich material ammonia is given off, wasting valuable nitrogen and causing your pile to stink. These types of materials also tend to be very wet, leading to anaerobic decomposition and mold - more stench.
3. Have some sort of compost bin. Some people prefer "lazy composting", where materials are just tossed in a loose pile and left to rot. This looks messy, the material breaks down slowly, it's difficult to get to the finished compost (generally somewhere in the middle of the pile), and the pile will eventually be invaded by weeds and tree roots. This is really only a good option for people who live in rural areas and are not planning to use the compost but just looking to get rid of a lot of excess materials.
4. Have the biggest bin you have room for and can fill. Large bins hold more and break down materials faster. Commercially sold compost bins, including tumblers, are often much too small to work as advertised.
5. At a minimum, turn the pile a few times a year, or as often as every two weeks. Turning the pile makes the materials break down faster, discourages invasion by weeds and trees (and squash vines, which often sprout from seeds in my pile) and lets you see when the pile is ready to be screened.
6. Corn cobs and corn husks can attract raccoons and rodents to your pile. (The cobs also take a long time to break down.) If you want to include these, put a secure lid on the pile and bury them well. Coffee grounds left on top of the pile can draw fruit flies and should also be buried well.
7. Tree leaves can (and should!) be composted, but keep in mind that they tend to mat together, preventing bacterial colonization and water penetration. They are also very dry to begin with. You can make them break down faster by shredding them first (some people like to run over leaf piles with a lawn mower, but this seems dangerous and ineffectual to me), add them in small quantities, or turn the pile more often in the beginning, being sure to shake apart any leaf clumps. Incorporating soil in the pile seems to help. Leaves can also be left out of the pile and used to make leaf mold, or added to the pile after partially decomposing in plastic bags. Tree leaves contain a lot of carbon, so they need to be mixed with a lot of nitrogen-rich material to break down and the finished product may be low in nitrogen, a common trait of home-made compost.
8. It's possible to buy special containers for storing kitchen scraps to bring out to the compost pile. Some even come with special filters built into the lid to help absorb odors. I think for most people these are unnecessary. I keep my kitchen scraps in an open jar on the counter and try to empty the jar before water begins to collect in the bottom. Some kitchen scraps are more prone to cause stench than others; for example, cucumbers and tomatoes will break down into watery, moldy goo in a day or two, while potato peels will quickly dry out in the open air and not bother you for - well, longer than I've ever waited to empty my jar. You can also store your jar in the refrigerator if it tends to stink or draw insects. During the winter I take my jars to the compost pile about once a week, during summer I go every two days to prevent fruit flies.
9. Situating your compost pile within short walking distance of the kitchen encourages you to empty your jar more often, and makes it easier to notice problems before they get too out of hand.
10. Don't expect to make a lot of compost. The materials you compost will end up reducing to somewhere between 1/3 - 1/9 of their original size, depending on what they are.
My compost system:
I have a three-layer wood bin, made from ordinary 2x12 lumber, just under one cubic foot in size. The three layers are basically wood squares that sit one on top of the other. I stack them alternately on and off of a piece of old scrap plywood that's falling apart. I made a fourth wooden square from wooden bed slats that just fits over the top of the bin, with one cross-piece to keep it from falling down and chicken-wire stapled to the top to keep out large animals. Sometimes in the spring I staple plastic over the top, too, if I think the pile is getting too wet. When I want to turn the pile I take the lid off and move one of the squares onto the ground next to the pile. Then I use a pitchfork to throw stuff from the top of the pile into it, trying to mix things up as much as possible and let some air into any clumps of leaves. When that bottom square is full I stack another on top of it, and continue until I've moved the whole pile. When the pile is nearly finished I sometimes have to use a shovel, as the materials get too broken down for the pitchfork. I used to turn my pile every two weeks, but now it is more like once a month during the summer and every other month when it is cold out. The lid doubles as a screen when the pile is finished. I save all my kitchen scraps, plus some that friends bring to my house, and most of the leaves from three large maple trees, plus needles from our pine tree and leaves that blow into my yard from elsewhere. I don't use leaves that have fallen in the street, which tend to be mixed with rocks, litter, and bits of broken pavement. I also usually find a good source of used coffee grounds (a "green" material, believe it or not) once a year and add a couple five-gallon buckets of those. Once or twice a year I can talk...someone...into peeing on the pile, but that takes a lot of alcohol and is probably not the boy scout way.
Using compost in a garden:
When I first started composting I used to find some references and people that talked about compost as though it could be used in place of fertilizer in the garden. Others would insist that compost was no fertilizer but still extremely useful as a soil conditioner. Both groups are correct, but they are talking about different kinds of compost. Compost that is made with manure, by someone who knows what they're doing, can be rich enough in nitrogen to grow a garden in - this is the kind of compost that people worry about "burning" their plants with; it should be applied to the soil well in advance of planting. In home compost piles excess nitrogen is generally given off during the decomposition process in the form of gases, and the final product does not contain sufficient nutrients to support long-term plant growth, though plants will certainly sprout and take off in it. However, it is great for increasing the nutrient- and water-holding capacity of the soil, and for encouraging soil activity in the form of bacterial, insect, worm, and fungal growth, which are all good for your plants.
Vermicomposting:
I don't know much about vermicomposting, but it is supposed to be a viable alternative for people who live in apartments or want to compost in an office building. Kids (and grown-up kids) seem to really enjoy it, at least for a while. I have read some complaints that it is a pain to keep the worms alive if you go on a long vacation, or are just neglectful, and that other pets can make a big mess out of a worm bin.


No comments:
Post a Comment